
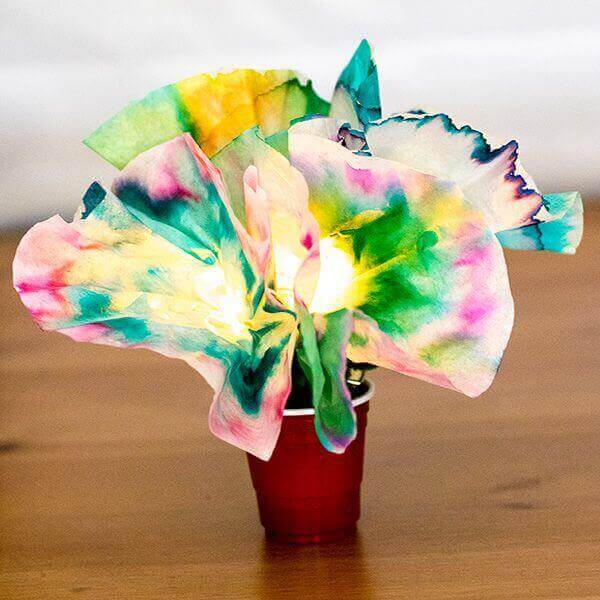
Chromatography Circuit Flowers Activity

This is a science experiment that turns into something you'd want to display on a desk or table. Draw stripes on coffee filters with markers, and then fold them up into triangles and dip the pointy end in water; the water will travel up the filter and separate the marker into different pigments, making a cool pattern on a flower-shaped filter.
To Make The Circuit Flowers You Will Need:
- Coffee filters
- Washable markers
- Plates
- Water
- Water dropper or syringe
- LED's
- Wire
- Clothespin
- CR2032 coin battery
- Scissors
- Electrical tape (green)
- Mini solo cup or mini clay pot
- Pipe cleaners
How To Make The Circuit Flowers:
Chromatography
The first step is to make your beautifully coloured papers using a technique called chromatography. This process works the best if you use secondary and tertiary colours, as they will separate as they spread, creating gorgeous patterns on your paper.
-
Start by flattening a coffee filter on a plate or other easy to clean surface.
-
Using a washable marker draw a thick lined circle about half way between the middle and edge. You can use one colour, alternate colours, or even create a few circles (leave a wide space in between). There are no rules, except to ensure lots of white space is left to allow spreading of the colours.
-
Now add about a teaspoon of water to the middle of the coffee filter. As the water moves through the paper it will spread the colours out, and depending on your colours, may cause them to separate. You should end up with a beautiful water coloured paper.
-
Let dry completely.
Circuit
-
Always test the LED! The last thing you want to do is build your flower only to discover your LED doesn’t work. Simply slip your coin battery between the legs of the LED. If it doesn’t work, turn the battery around. If it still doesn’t work you need a different LED.
-
Cut your wires and strip the ends. You need two wires, approximately 20 cm in length. Strip about 13 mm from each end to expose the wire. These are your contact points with your battery and LED.
-
Take your coffee filter paper and grab it in the middle, roll and bunch it to gather it up and form your flower. You should have a small “stalk”.
-
Push the legs of the LED bulb through the paper just off to the side of the stalk in your paper.
-
Now wrap one wire tightly around the first leg. Repeat with the other wire around the second leg.
-
Slide the legs of the LED onto the end of your clothespin, so one leg is on each side. Tape into place.
-
Now tape your stalk to the other clothespin end. This is to help secure everything.
-
Wrap the wires around your clothespin, then separate the wires, and wrap them individually around each side as you get down to the clamping end of your clothespin. You want to end your wrap with the stripped part of your wire on the inside of the clothespin.
-
Now slide your battery into the clothespin so it makes contact with the wires. If it doesn’t work, turn your battery around.
Notes:
You can wrap the clothespin with green pipe cleaners to finish it off so it looks nice.
You could use real, miniature, clay pots or miniature red solo cups as the perfect pot for your bouquet.
To turn on your flowers, simply open the clothespin and insert the battery. To turn them off, remove the battery. Do not leave turned on for long periods of time. With a little care, your circuit creations can last a long time.
Even without the lights this bouquet is so beautiful!
Tutorial from STEAM POWERED FAMILY